Recording a Zoom meeting provides several benefits for your attendees and future audience. Using the recordings, you can easily reference back to specific topics, or share the video with coworkers who were not able to attend. But, once you finish your meeting and have a long recording, how do you trim the sections that matter? We answer how to edit a zoom recording with a few simple steps.
Choosing a Program to Edit a Zoom Recording
The very first step to editing a zoom recording should be to choose what editing software you are going to use. Free programs like OpenShot, VSDC, and DaVinci Resolve provide a simple solution at no extra cost for advanced users. For basic users, we will be referencing the cloud based video editor offered on YouTube, for free!
Where to find your Zoom recordings
Before you do any editing, you will need to find the saved recording file on your computer!
By default, local recordings will be placed in the following directory:
- Windows: C:\Users\[Username]\Documents\Zoom
- Mac: /Users/[Username]/Documents/Zoom
- Linux: home/[Username]/Documents/Zoom
If you are unable to open the recording file in the folder above, you may need to convert the local recording first. To convert your local recording files:
- Open the Zoom desktop client and click the Meetings tab.
- Select the Recorded tab and choose the meeting with a local recording.
- Click Convert to convert the recording to a video file.
Editing your Zoom Recording on YouTube
This section will cover how to upload your Zoom Recording to YouTube, and how to begin editing so you can make your recording look as professional as possible.
Uploading your Recording
To upload your Zoom Recording to YouTube Studio, users must first create or sign into their YouTube account. Once signed in, click the Camera icon in the top right corner and select “Upload video”.

Next, click “Select Files” and navigate to the folder that your Zoom recording is saved in.
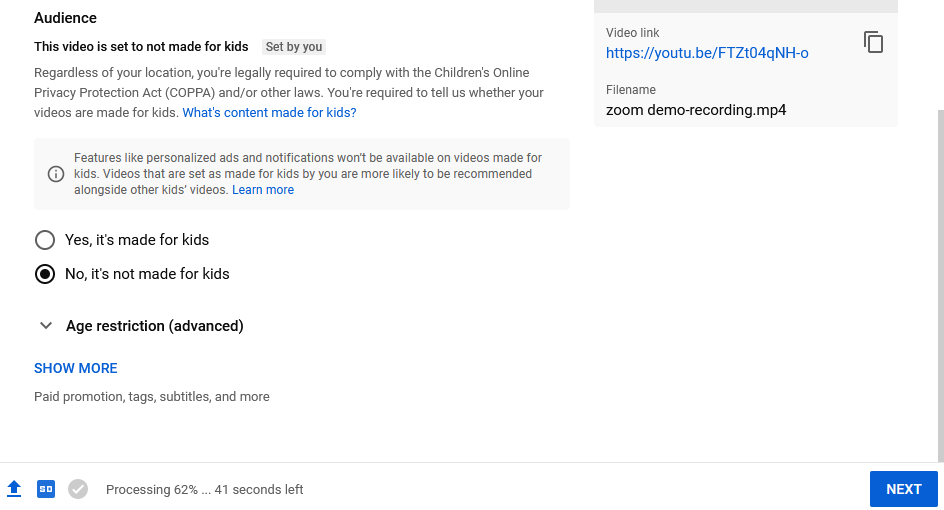
Once you find your Zoom recording, click open and let the video upload to YouTube Studio. Under Audience, select “No, it’s not made for kids” and click “Next”.
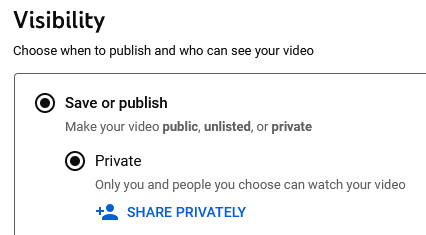
Continue to click “Next” until you are under the Visibility section. Ensure that your video Visibility is set to Private so not all YouTube viewers can find your video.
Finally, click save and your video will successfully upload to YouTube Studio.
Editing with YouTube Studio
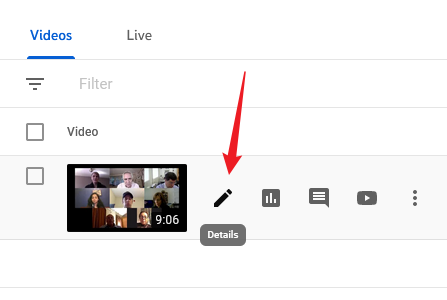
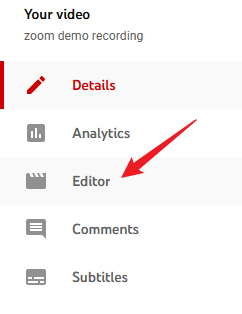
Now that you uploaded your Zoom Recording, it will appear on the Channel content page. Hover over the video and click the Details icon.
On the left side of the screen, select the Editor button.
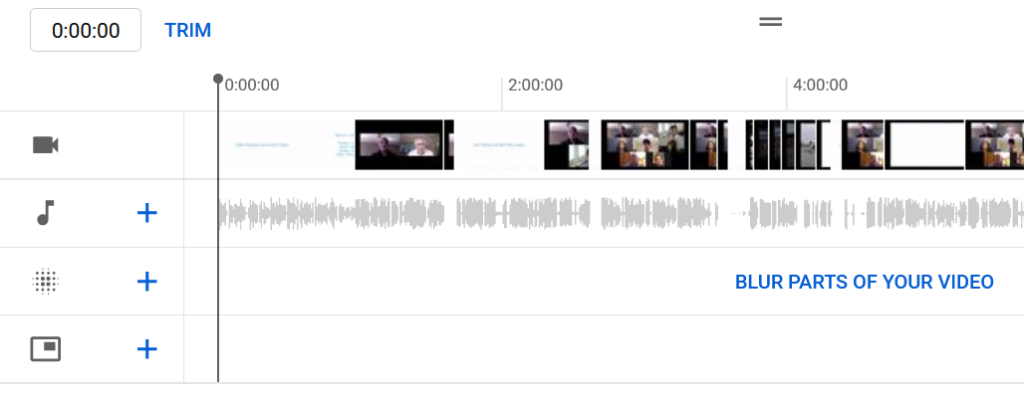
An introduction screen may appear if you are a new user. If this pops up, simply click “Get Started”.
Finally, your recording will appear on the Video editor screen. Here you can trim the beginning, middle, or end of the recording, blur faces, add audio, and more!
Once you complete editing your Zoom recording, click the Save button on the top right corner of the screen. Note that it will take some time for YouTube to process any changes.
After the video has been processed, you can download the video back onto your computer by navigating to the Channel content screen, clicking the Options icon, and selecting Download.

Additionally, users can enter the Details page and change the video visibility. Using these settings, you may choose to allow certain friends or coworkers to view the edited Zoom Recording on YouTube.
Conclusion
Following these simple steps, users should be able to find their saved Zoom recording, upload the video to YouTube, and edit the recording with YouTube’s integrated Editor. Though, advanced users may enjoy various editing features by using software such as OpenShot, VSDC, or DaVinci Resolve. For simple edits and effects, YouTube Studio provides everything you need!