Windows 11 is Microsoft’s new and improved operating system. However, as of November 2022 only 16% of PC’s around the globe are utilizing this OS. Compared to almost 70% of users running Windows 10, Microsoft should be asking themselves why this number is still so low. Windows 11 users have been complaining of several bugs, glitches, and even integrated ads with the new operating system. In this article we answer the common question, how to fix Windows 11 freezing issues?
Method 1: Change the Screen Resolution
Since the release of Windows 11, several users have complained of their screen resolution being the culprit of random crashes and freezes. These types of freezes are often triggered by a resolution that is higher than what your graphics card is intended for.
We recommend checking your screen resolution, and trying to lower the display setting to see if this solves the Windows 11 freezing issues. To check your resolution:
1. Right click on the Windows Start Menu and select Settings.
2. Once the Settings menu opens, select System from the menu on the left side of the screen.
3. Next, select Display and scroll down to Scale & Layout where you will be able to adjust the Display Resolution to a lower value.
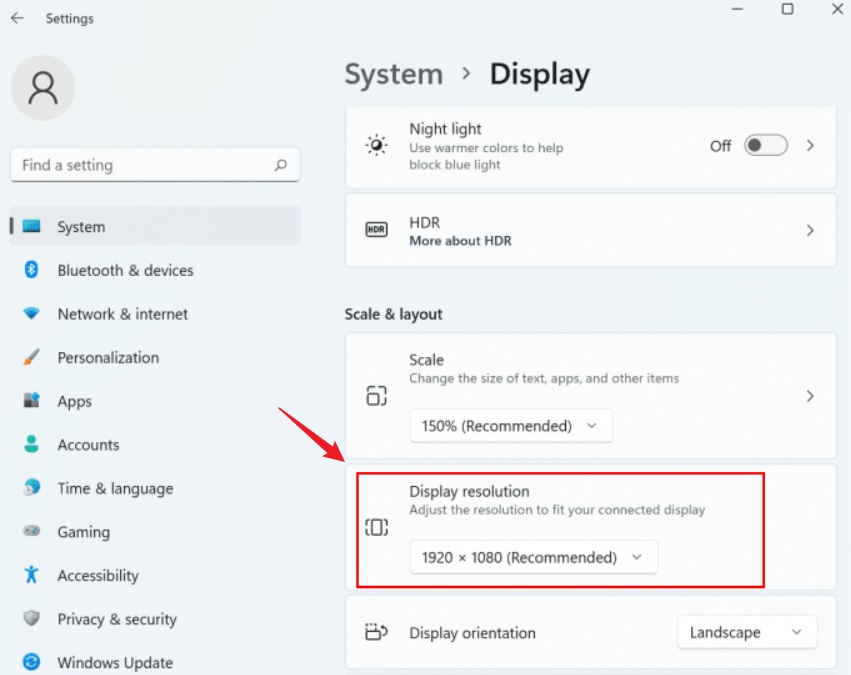
Note: If you are using more than one monitor or screen, be sure to adjust this setting for each display.
5. Finally, apply the change by selecting Keep Changes when prompted by Windows.
That’s it! You may now begin using Windows as usual, and determine if this has solved the Windows 11 freezing issues.
Method 2: Update Your Graphics Card Drivers
Another common cause for Windows 11 freezing is by running outdated GPU drivers. On a regular basis, graphics card manufacturers release new drivers that fix common bugs and display errors. Outdated drivers could have a negative impact on Windows 11 and cause your system to freeze. To update to the latest drivers:
1. Right click on the Windows Start Menu select Device Manager.
2. Scroll down and open the menu labeled Display Drivers.
3. Right click on your GPU device and select Update Driver.
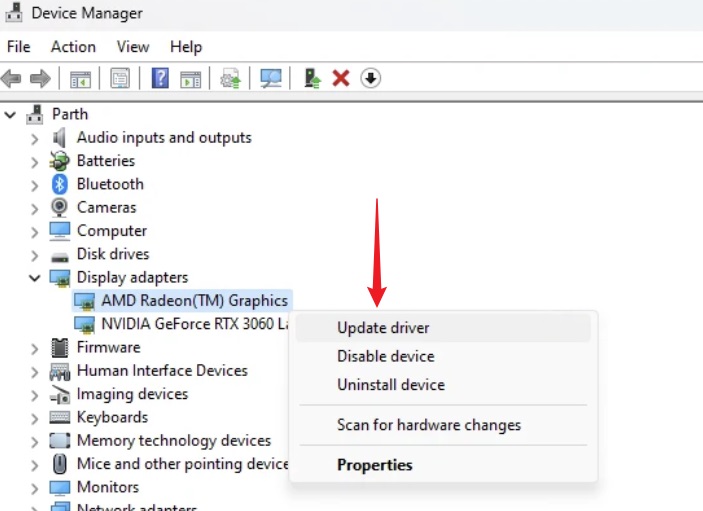
Additionally, for custom PC’s with dedicated graphics cards, users should navigate to their manufacturers website and scan for the latest drivers. Here is where you can check for updates with an NVIDIA graphics cards, and here is where you can update with AMD.
Method 3: Run a SFC Scan
Unfortunately, Windows 11 can freeze due to corrupted system files. To fix this issue, Microsoft has incorporated a System File Checker into their operating systems. This tool is used to scan and restore corrupt system files, and correct any OS errors. To run a SFC scan:
1. First, open the Search Menu and type cmd.
2. Right click on Command Prompt and choose Run as administrator.
3. In the Command Prompt, type the following command and press Enter:
sfc /scannowThis process will take some time, depending on the type of PC you have. Once complete, resume using your operating system to confirm if the freezing issues have been resolved.
Method 4: Remove Temporary Files
Everyday computer use results in temporary files being created on the back end of your operating system. Sometimes, these temp files can pile up and affect the system’s performance – causing delays and possibly freezes. To delete temporary files in Windows 11:
1. Right click on the Windows Start Menu and select Settings.
2. Next, select System in the left menu and navigate to Storage.
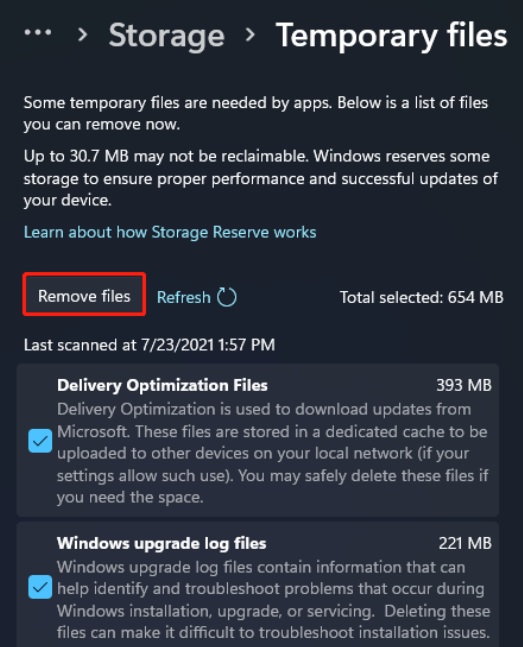
3. Find the Local Disk section and select Temporary Files.
4. Finally, select the temporary files that you wish to remove and click Remove files.
Once removed, verify that the freezing issues have been resolved. If this step fixed the problem with your OS, be sure to clean out your temporary files on a regular basis.
Method 5: Adjust the Virtual Memory
Lack of memory resources could be a cause for freezing issues on any operating system. If your computer seems bogged down and unable to keep up with the tasks that you are trying to perform, consider updating your virtual memory:
1. Right click on the Windows Start Menu and select Settings.
2. Next, search for the term Performance in the top left corner, and select Adjust the appearance and performance of Windows from the search results.
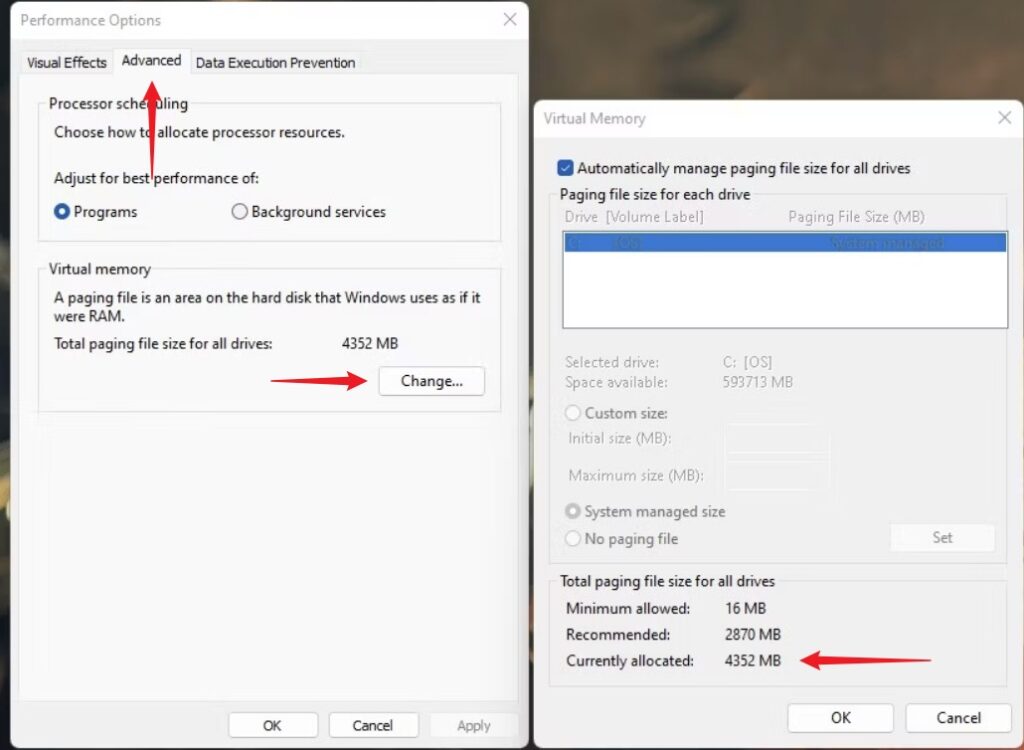
3. Once the Performance Options menu opens, select the Advanced tab.
4. Finally, click Change… under Virtual Memory.
5. Now that the Virtual Memory menu has opened, make sure that the Currently allocated: value is greater than or equal to the recommended memory.
Once complete, click OK and reboot your device. Your system should now perform adequately without any freezing.
Conclusion
In this article, we answered the common question of “how to fix Windows 11 freezing issues” with 5 simple methods. Although we still recommend using Windows 10 until the bugs have been sorted in Microsoft’s latest operating system, the OS is still reliable for everyday use. For more information, check out our latest guides and fixes.